The information contained in this sticky is provided for educational purposes only and is not intended to replace veterinary advice. The intention of this sticky is to open doors to understanding about the specific medical condition or topic, allowing for educated and on-going discussion with your vet.
![]()
|
Diabetic Cat Care
Home Testing Your Cat’s BG |
Buying a glucometer to home test your cat's BG truly is the MOST valuable weapon you have when it comes to fighting the war against FD, and the chance of reversing your cat's diabetes. While it may seem intimidating at first, it is an essential, non-negotiable requirement when it comes to TR. Without testing, you literally are "shooting blind"; meaning you have no idea if your cat even needs insulin or not.
If your cat isn't yet on a low carb diet, "shooting blind" is almost guaranteed to be the number one reason behind unfortunate but preventable clinical hypos. By switching to a low carb wet diet following the Detox Process you'll make sure your cat is kept safe from clinical hypo if they've already started insulin. Once the detox process is over, the liver wakes up from being sucker punched by a high carb diet, and immediately the worry of clinical hypo is taken right off the table for otherwise healthy cats. Members on forum can help you understand which form of detox is most appropriate for your cat.
Another very common situation when new members arrive at DCC is their cats are on pretty hefty prescribed doses of insulin, sometimes 6 to 7.0 units of insulin (or more) per shot. This tends to occur due to the belief most vets have that insulin lasts at least 12 hours in cats (which it doesn't). Home testing your cat's BG will confirm this to be true more often than not.
In addition, the faith the veterinary community at large puts on a Fructosamine blood test is misplaced and is an indication the vet might not have a lot of experience when it comes to Feline Diabetes. This test is a misrepresentation of what's really going on inside when it comes to how insulin doses are actually working; only providing the average BG over the course of the past 2-3 weeks. Fructosamine testing does not indicate what the BG is at nadir (when the insulin is most powerful/lowest BG on the shot) - there's no way to know from a Fructosamine test if a cat's BG is dropping too low, or not low enough. Typically veterinary prescribed insulin adjustments are based on only the average BG provided by the Fructosamine and as a result, the vets assume the insulin isn't doing what it's supposed to and they'll prescribe increase after increase without seeing much difference when it comes to results.
Relying primarily on Fructosamine testing is a method of treatment which very often creates a situation called Chronic Rebound - where the BG is high at shot time, the amount of insulin unknowingly drops the BG much lower than expected at nadir, and then the BG "rebounds" back up to very high numbers. It's very much like being on a roller coaster and certainly can't feel very comfortable for our cats. Many folks are somewhat skeptical to learn this might be what's going on inside, and then are usually quite stunned to watch this very thing play out right before their very own eyes the first time they do a curve at home; testing their cat's BG at shot time (before insulin) and then every 2-3 hours over the course of the 12 hour shot.
When members first arrive at DCC, the first recommendation made will be to buy a glucometer and test strips so you can do a curve to learn what's really going on inside. Once it becomes clear exactly how the insulin is working for their cats, then it becomes very easy to change the approach to get the cats to where they should be - into safe numbers where ketones are not being produced, and ideally into ideal range numbers where the pancreas is able to start healing, and if possible diet controlled diabetic remission can occur.
Every member at DCC has had to go through the process of learning how to test their cat's BG and will share their tips and tricks to quickly make it become routine for both you and your cat. Here's a good article to help understand better how beneficial home testing of your cat's BG is; Retrospective study of owners’ perception of home monitoring of blood glucose in diabetic dogs and cats .
Home testing does not hurt your kitty, nor will it cause them to hate you - in fact, most of us have discovered home testing actually results in a much closer bond with our diabetic cats. There are very few nerve endings in a cat's ear....it is an annoyance at first for most cats - just like a mosquito buzzing round. Your kitty will test your resolve, just like your kids do; and in a very short while, you will come to find that your cat is quite willing to "do the job" when it comes to testing their BG. A low carb treat as a reward after taking a test is a really good incentive to reinforce there are good things involved when it comes to testing. In fact, many of our cats start to come let us know it's time for a test and decide they want to be part of the process! (you will have to allow this vodeo to play)
When first starting out, you may find your kitty is very apprehensive about the meter and lancet pen. Most cats will also sense their owner's angst about taking a blood test. Before trying to take your first test, some have found that leaving the meter, lancet pen, the closed vial of test strips and the carrying case on the floor so kitty can have a good smell and check it out at their leisure to be quite helpful. Some have also taken the glucometer, put a test strip in it and let the meter go through its bells and whistles - or have sat beside kitty clicking the lancet pen to acclimatize their cat to the new sounds. Most cats do not like to have their ears touched, so this is a good time to get them used to that, without actually taking a BG test.
Some people prefer to have a dedicated testing location; others find it easier to test the cat where they find them. You need a location that is well-lit, quiet, comfortable and relaxing for both you and your cat.
Have a "chat" with your cat; let them know that you are going to help them fight FD as best as possible and that you need their co-operation when it comes to the testing part. Reassure them it won't hurt, and while it may be annoying - it is part of their "job". Some pet owners even sing to their kitty, and the vocal kitty sings right back. Positive reinforcement is a great motivator, so remember a favorite low-carb treat to reward your kitty with afterward. Most owners find that within a week, their cat has become very accepting of testing, and some will even come to the testing "spot" when they know they will be rewarded afterwards for their hard work.
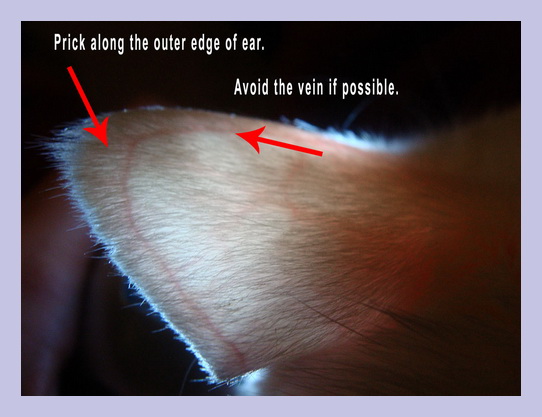
Please, never use the paw pad for testing your kitty – it is especially sensitive so the test is much more painful in that area, plus there is a risk of infection since kitty walks on floors, outside, in the litter box, etc. The best place (and least painful) is along the outer edge of the cat’s ear as outlined in the photo above. You can test along any edge, whether at the top or bottom, inside or outside of BOTH ears. Some owners take a razor and shave a small area on the ear if their cat is exceptionally furry. While you may think you are hurting your kitty when you prick their ear, please remember there are very few nerve endings in a cat's ear and he/she will be startled or annoyed rather than hurt. Keep in mind that things will improve very quickly; it is new for you both in the beginning.
After gathering your supplies, either go to where your cat is or bring your kitty and place him/her in a comfortable sitting position. In the beginning you are going to think you will never be able to do this, the cat may squirm and fuss, you may not be very successful getting blood, and you might feel like a failure because you can't seem to get the testing down. THIS IS NORMAL! Everyone has been right where you are; please don’t think you’re the only one who finds testing frustrating at the start. If you are having troubles with the testing, please post on forum for moral support and further tips and tricks from fellow members!
Take a deep breath and remember your kitty picks up on your emotions and stress and mirrors them right back to you. If you’re tense, your cat will be also. Relax and be calm and loving with your kitty; make this an intimate time for both of you to be close and cuddly with each other. Your kitty will learn very quickly to associate good things with being tested and you will both be pros within a few days.
Some cats will just not sit still for testing, at least, not a first. If you find that your cat is very difficult to hold and test, you can try the "kitty burrito" method of snugly wrapping the cat in a large towel in order to restrain it. Some have found putting kitty on the floor, between their legs, with their heads facing away from them works better; others put kitty between themselves and the arm of a chair to help keep them in place. Some find it helps to have another member of the family help to hold the cat still, however, some cats might feel like they are being "ganged up on" and will do better with less restraint. It will be up to you to find which way works best for you and your cat. Time and patience will win out, and testing will become easy for you both. Promise!
As you will see in the links to the videos below, there is a vein that runs just along the outer edge of your cat’s ear. You can easily see this vein by shining a flashlight or a lamp from the other side of the ear. From the vein to the outside edge of the ear is what’s called the "sweet spot" which contains capillary blood, and this is where you typically want to aim your lancet. If you miss the outer edge and instead prick the vein, it’s okay, you will just get much more blood than you need. If that happens, just use the blood sample you get and try to get closer to the edge next time.
Your cat’s ear will provide blood much easier if it is warm before you prick it. There are several ways to warm the ear, you can try them to see what works best for you. Some people use a clean sock filled with a half cup of uncooked rice – tied off with an elastic, heated for about twenty seconds in the microwave (it should be very warm but not too hot for the cat, test it on the inside of your forearm first). Others like to use a soft washcloth dampened with hot water and placed in a plastic baggie (although some cats do not like the "crinkling" sound of the plastic). You can hold either one of these aids against your cat’s ear for about 15 seconds or so, then check to be sure the ear is comfortably warm. If the ear is still cool to the touch, warm it some more because it will not bleed easily if it’s cold, especially the first few times you test. The cat’s ears need to "learn" to bleed which takes a bit of time. You can also gently massage your cat’s ears and head and chin, giving him lots of cuddles and scratches while you "warm" his ear with the massage, this will also stimulate blood flow. If you don’t see a bead of blood form immediately, you may need to "milk" the ear by stroking/massaging upward from the base of the ear to the area where you've pricked the eat to get the blood to flow. A few seconds of doing this should result in a nice bead of blood. Some find using a very small amount of petroleum jelly helps to create the bead of blood.
You can use a lancet either by itself or with a lancet device/pen. Many glucometers come with a lancet pen so you can try it both ways to see which you prefer. If your lancet pen comes with a clear cap, it will make it easier to see where you are aiming. The lancet device/pen does make a clicking noise, so it may help to use it around your kitty a few times, without testing, just so your kitty gets accustomed to the sound.
Before you prick the ear, position your test strip just inside your glucometer without pushing it in all the way, so it is ready to be pushed in at the last minute. Each meter gives you a certain amount of time to get the blood sample and apply it to the test strip; if you don’t get it done in that time frame, you will have to start over with a new strip.
Once the ear is warm, hold a cotton pad/napkin, etc. against one side of the ear, and prick the other side, quickly and firmly. Don’t be afraid of pricking through the ear. It is likely you will prick through the ear at one time or another, but it will be a tiny hole that will heal quickly and will not cause a problem.
Once the bead of blood has formed, hold your cat’s ear with one hand and push the test strip all the way into the meter with the other. Typically the meter displays an image of a drop of blood when it’s ready. Make sure you still have a relatively firm hold on your kitty's ear so he doesn’t shake his head (and fling the coveted blood off his ear!), bring the meter/strip to the blood and use a scooping motion to let the strip suck up the blood. The strips typically absorb the blood like a sponge and you shouldn’t have a problem at this point. If you do, you can always scoop the blood on to a fingernail and then take your test from there - just make sure your hands and nails are clean and dry. After a bit, testing will be much easier and come more naturally to you and your cat.
Some meters will beep when there’s enough blood, others just start counting down until the test result is displayed on the screen. Remember to write down the test number, and later you can transfer it into a computer log or other record-keeping journal. Most meters retain the blood tests in memory, but you may not yet be familiar with how to recall it from your meter, and you need to recall the BG level to determine how much insulin your kitty needs if it is shot time.
While the meter is going through its paces to provide the BG, wrap the cotton pad/gauze/napkin around both sides of your cat’s ear and press FIRMLY (but not too hard) for a good 10-15 seconds; this ensures the bleeding has stopped and also reduces any bruising that may occur. Bruising is very common when first starting to test BG and can cause some owners a bit of angst. Rest assured, as the ears get used to being tested, bruising quickly subsides. Arnica gel, calendula cream, a small amount of Polysporin or a weak 3% peroxide solution can be held on the ears to help soothe the ear.
When done, give kitty lots of love and cuddles along with a low-carb treat and praise him over and over for a job well done! Kitty will reward you by being much easier to handle as you both learn to deal with this illness. In fact your kitty may surprise you by coming to YOU to be tested in the future!
Once you and kitty have the testing down, you won't need to give a treat at every test. Please make sure to factor treats given in to your cat's daily food allotment.
At the start of TR you will be testing more frequently. As soon as you are able to do so, plan to do a curve where you test every two hours after an insulin injection and record the numbers in your test log on forum. You are accumulating information to see how your cat responds to the insulin, and experienced members will use the data you collect to help guide you with adjustments to dosing.
Links to Videos and Photos
The links below will be helpful to watch before attempting your first home test. While you might believe these cats are far more cooperative than your cat will ever be, the truth is they might have been just as uncooperative when they first started out! With time and practice, you'll have the testing down before you know it. If it doesn't work the first time, leave the testing go for 15-30 minutes, then try again. Don't give up!
Feline Outreach Video using lancet pen (Cat Louie)
Feline Outreach Video also using lancet pen (Cat Dreamsicle)
Buddy the Diabetic Cat (using a lancet alone)
Picture of Ear Vein/Test Area courtesy of Moose GA
© 2009-2024 Diabetic Cat Care - DCC's information may be used on other websites (with restrictions), for more information read All Rights Reserved